Installing and Configuring Advanced Reporting
Scenario: You want to configure the Advanced Reporting feature and access the reports based on Advanced Reporting using a Installed/Web/Windows App Client on a remote computer.
To install Advanced Reporting using Post-Installation, see Post-Installation Steps for Advanced Reporting.
Reference: For background information, see the reference section.
Workflow diagram:
Prerequisites:
- You have installed a Server with local web server (IIS) using the Custom Installation mode. (see Install Internet Information Services (IIS) on Different OS Types in Complete the Installation Planning Requirements.) and you have:
- Added the extension Advanced Reporting to the Server project, which in turn adds the Web Services and Application Host Base extensions in the project. (see Add an Installed Extension to a Project in Server Projects Configuration Procedures.)
- The dependent extensions (for example, Energy Reports, InfoCenter Reports, and Pharma Reports) for which the template synchronization must be done during the Advanced Reporting template synchronization step must also be selected for installation and added to the Server project.
- Created a website and if Web/Windows App Clients are used then create a web application in SMC. (see Create a Website in Setting up the Web/Windows App Clients.).
- Ensured that the Default Web Client does not belong to any Management Station security group. However, if it does, ensure that this group does not restrict access rights, otherwise, you are not able to view the reports.
- On a remote computer, you have:
- Imported the website/web application certificate in the appropriate Windows Certificate store. (see Import a Certificate in the Windows Store in Setting the Certificates as Default Certificates.).
- You are aware of the system ID of your project.
Steps:
Install the Advanced Reporting MSI that in turn installs Open JDK, Tomcat Server and Business Intelligence and Reporting Tools (BIRT).
- On the Distribution Media, navigate to the …\InstallFiles\EM\Advanced_Reporting\AddSW folder.
NOTE: Beware that there is another Advanced_Reporting msi file located at the path
…\InstallFiles\EM\Advanced_Reporting. Do not use this to manually install Advanced Reporting.
- Double-click the Advanced_Reporting.msi.
- The wizard for Advanced Reporting displays.
- Follow the instructions provided in the wizard to complete the installation.
NOTE: You can also change the value of the default connector port to a different value. You must note down the port number as you will need it when specifying the Main URL and Creating Advanced Reporting web application.
- The Advanced Reporting MSI is installed.
- After the installation is complete, ensure that the Apache Tomcat service is running in the Services, else you must manually start it.
NOTE: Open JDK 13.0.2, Apache Tomcat 9.0.37 and Advanced Reporting is upgraded by latest version of Advanced_Reporting.msi.
- In order to know the port assigned to Tomcat after installation, check the Birt_Installer_[yyyymmdd-hhmmss].txt log file located at C:\ProgramData\Siemens\GMS\InstallerFramework\GMS_Installer_Log, for HTTP_CONNECTOR_PORT value. If a port conflict is detected then a new port will be auto-assigned to HTTP_CONNECTOR_PORT.
- If the port assigned to Tomcat is other than default (18080), then set this port number in the Main Url Value text box, in the Extended Operation tab.

NOTE:
In case of Open JDK, if current version is lower than the one integrated in MSI, then the higher version will be deployed by Advanced Reporting MSI. There is no support for remote Tomcat Server for Advanced Reporting. A deployment where the Advanced Reporting MSI present in AddSW is installed on a machine other than the Desigo CC server, is not supported.
You need to create the Advanced Reporting web application to work with Advanced Reporting using the Web/Windows App Clients on the remote computer.
- In the SMC tree, navigate to Websites > [website] where you want to create a web application.
- Click Create Advanced Reporting Application
 .
.
- In the Advanced Reporting Information expander, do the following:
a. Retain the default URL: http://localhost:18080/gms-birt.
b. From the drop-down list, select the appropriate Web Services URL. The Web Services URL is listed in the drop-down list only if it is present under the same website. If the URL is not present, then you will have to manually enter the URL in the following format, https://[hostname]:[port]/[application name]
c. Enter the System ID of your project. This value must be within 1 to 2048. If the System ID is changed in the Server Project Information expander in the Project Settings tab, then you will have to update the ID manually in the Advanced Reporting Information expander as it will not be automatically updated.
NOTES: When updating an advanced reporting web application, ensure the following:
NOTE 1: With Version 5.1, the Advanced Reporting web application requires you to specify the Web Services URL and System ID. In this case, you must update the existing Advanced Reporting web application by clicking Edit and specify the value for Web Services URL and System ID.
NOTE 2: If any energy reports are configured in your project and if the web services URL that you have set using the advanced reporting web application is different than the URL that is configured on the Advanced Reporting configuration page, then you must regenerate the cache. If you do not want to regenerate the cache, then do not update the advanced reporting web application for the particular project.
- In the Web Application Details expander, type a unique name for the web application.
- Click Save
 . A confirmation message displays.
- Click OK.
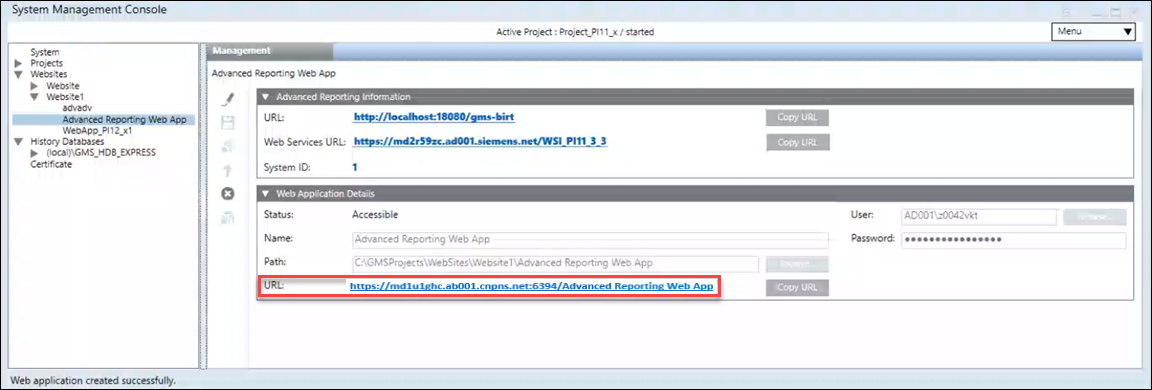
- The data is validated and, on successful creation, the following occurs:
- A new Advanced Reporting web application node is created and selected by default.
- A read-only URL for Tomcat Server http://localhost:18080/gms-birt displays in the Advanced Reporting Information expander. 5,
- A read-only https URL for Advanced Reporting web application
https://[Fully qualified host name of the Tomcat server]:[Port Number]/[Advanced Reporting web application name] displays in the Web Application Details expander.
- In the System Management Console (SMC) proceed as follows:
a. In the SMC tree, select the Advanced Reporting web application, if not already selected.
b. From the Web Application Details expander, click Copy URL to copy the URL for Advanced Reporting web application:
https://[Fully qualified host name of the Tomcat server]:[Port Number]/[Advanced Reporting web application name]
- In the SMC tree, select the Server project that you want work with.
- In the toolbar, click Start
 to start the Server project.
- Logon to the Desigo CC Client application.
- In System Browser, select Application View.
- Select Applications > Advanced Reporting.
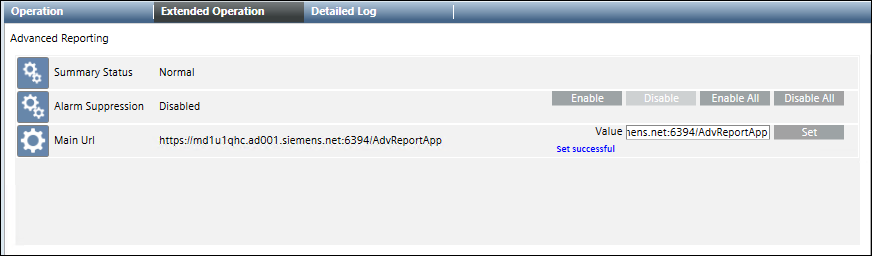
- In the Extended Operation tab, in the Main URL Value text box, paste the copied https URL and click Set.
- The Main URL is configured.
- In the Application Viewer tab, click the link for Configuration Page.
- The wizard on the Configuration Page - Advanced Reporting displays.
If the configuration page does not display, it means that either the Main URL is not configured properly or the Tomcat Server is not reachable or has stopped.
Alternatively, the Default Web Client, internally used for accessing the Advanced Reports, restricts the access rights. For more information, see Troubleshooting.
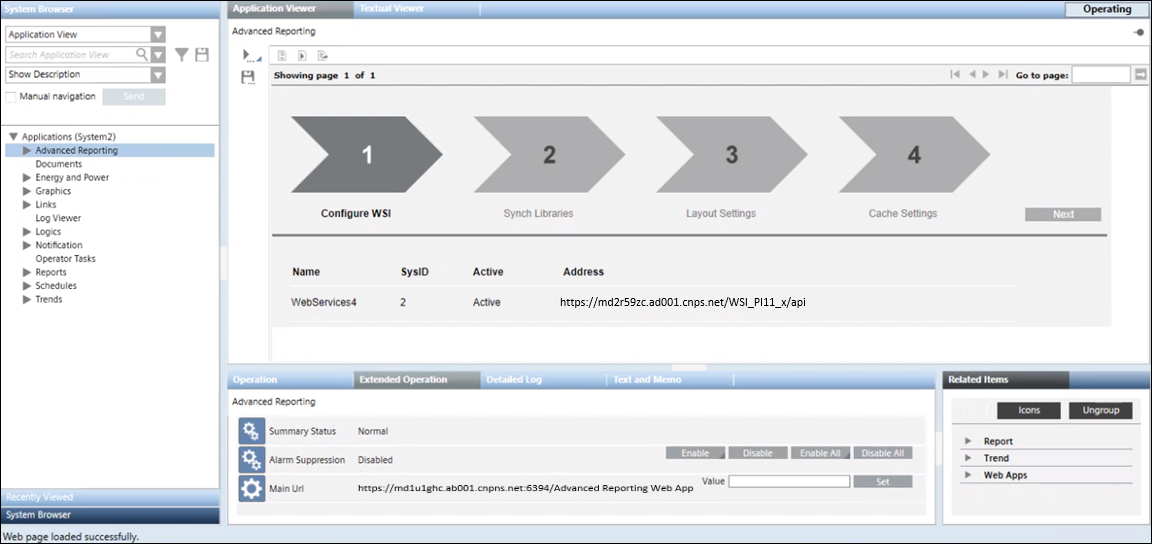
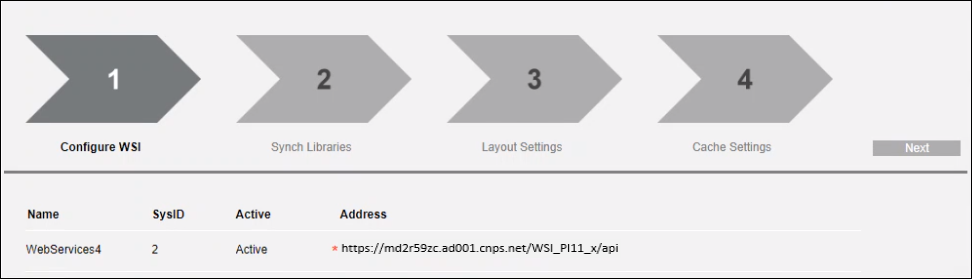
- In the Configure WSI page of the wizard that displays, the WSI URL is displayed.
For example, URL: http://localhost:8080/api/.
- The Web Services URL is displayed.
Use this procedure to deploy the Advanced Reporting templates from the library to the Tomcat server. If the dependent extensions (for example, Energy Reports, InfoCenter Reports, and Pharma Reports) are added to the project, then the respective templates are already deployed in the libraries at the path [InstallationDrive]:\[Installation Folder]\[Project Name]\libraries\[Library Name]\AdvRpt\[Zip File for Pharma or Energy Reports (AdvR_GMS_Pharma or AdvR_GMS_EnergyReport].
- The dependent extensions (for example, see Energy Reports, InfoCenter Reports, and Pharma Reports) for which the template synchronization must be done during the Advanced Reporting template synchronization step are added to the Server project along with the Advanced Reporting extension.
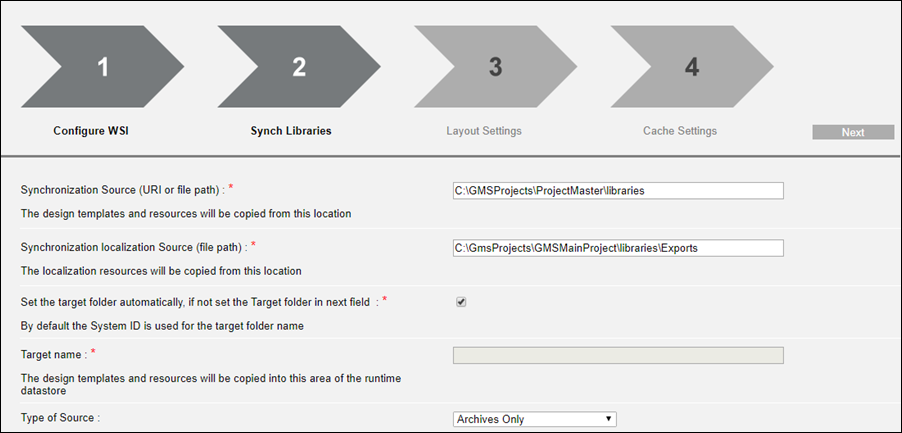
- In the Synch Libraries page of the wizard, do the following:
a. In the Synchronization Source (URL or file path) field, enter the path to the libraries folder of your project. For example, [Installation Drive]:\[Installation Folder]\[Project Name]\libraries.
b. In the Synchronization localization Source (file path) field, enter the path to the exports folder of your project. For example, [Installation Drive]:\[Installation Folder]\GMSMainProject\libraries\Exports.
c. Ensure the Set the target folder automatically, if not set the Target folder in next field check box is selected to automatically set the ID of the system as the name of the folder where the advanced reporting templates will be extracted on the Tomcat server.
Alternatively, to manually enter the System ID, unselect the check box and then select the option button next to Target name and type the System ID.
d. In the Type of Source drop-down list, retain the default Archives Only.
e. Click Next.
- The Advanced Reporting templates (including the templates for the configured dependent extensions such as Energy and Pharma reports) are synchronized and deployed at the path
C:\Program Files\Apache Software Foundation\Tomcat 9.0\webapps\gms-birt\[System ID]
folder on the Tomcat Server.
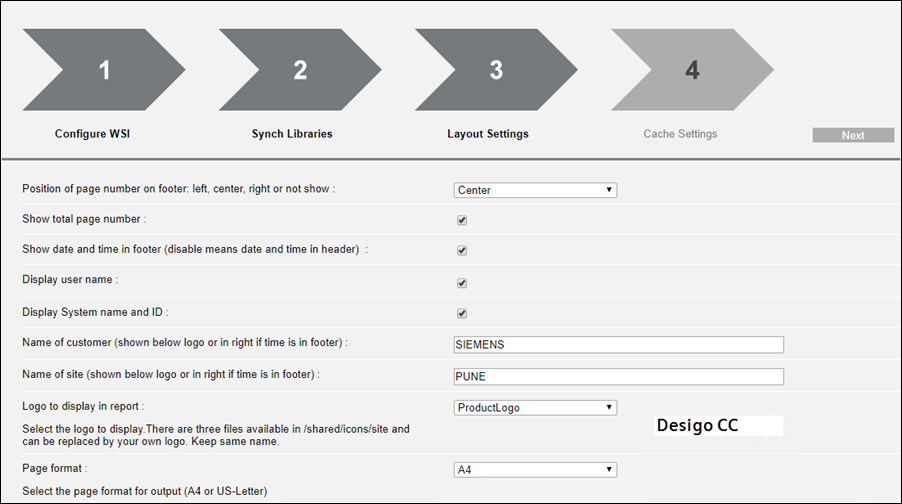
- In the Layout Settings page of the wizard, specify the values for the position of the page number, the current page number with the total number of pages in the report or just the current page number, date/time when the report is generated, display user name, display system name and ID, name of the customer, name of the site, the logo to be displayed on the report, and the page format for output.
- Click Next.
- The layout settings for your report are now configured.
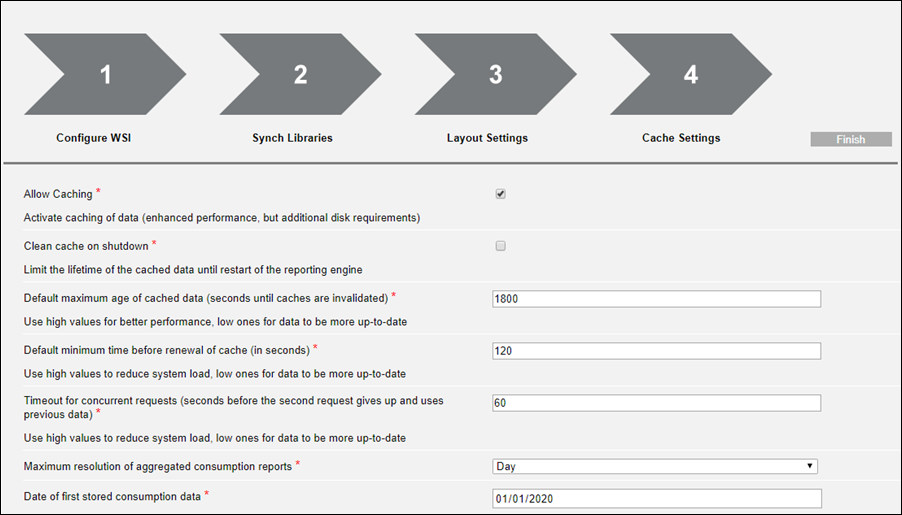
- In the Cache Settings page of the wizard, select the Allow Caching check box to allow caching, clean cache on shutdown is by default unchecked. Retain the default values for the default maximum age of cached data, the minimum time before renewal of cache, and the timeout value for concurrent requests.
NOTE: If Energy Reporting extension is added to the project, then in the Cache Settings page, you must also specify the values for the maximum resolution of aggregated consumption reports, and the date from when the consumption data is stored.
- Click Finish.
- The cache settings are applied.
Next, you can proceed with the configuration of reports based on Advanced Reporting, for example, Energy Reporting, InfoCenter Reporting, and Pharma Reporting.